expr:class='"loading" + data:blog.mobileClass'>

Friday, August 14, 2020

Farmhouse Kitchen Table Makeover on a Budget

HELLO!! It has been way too long! 

I am entering the blogging world once more to share with you some home DIY. I was going to try and share all these tips on my Insta or Facebook stories but decided it would be much easier to direct you here with more information and pictures that don't "disappear" in seconds.
Last year I completed a major kitchen remodel. Yes, I do plan on sharing more on that with BEFORE and AFTER pictures if it seems that people still read this little old blog! 
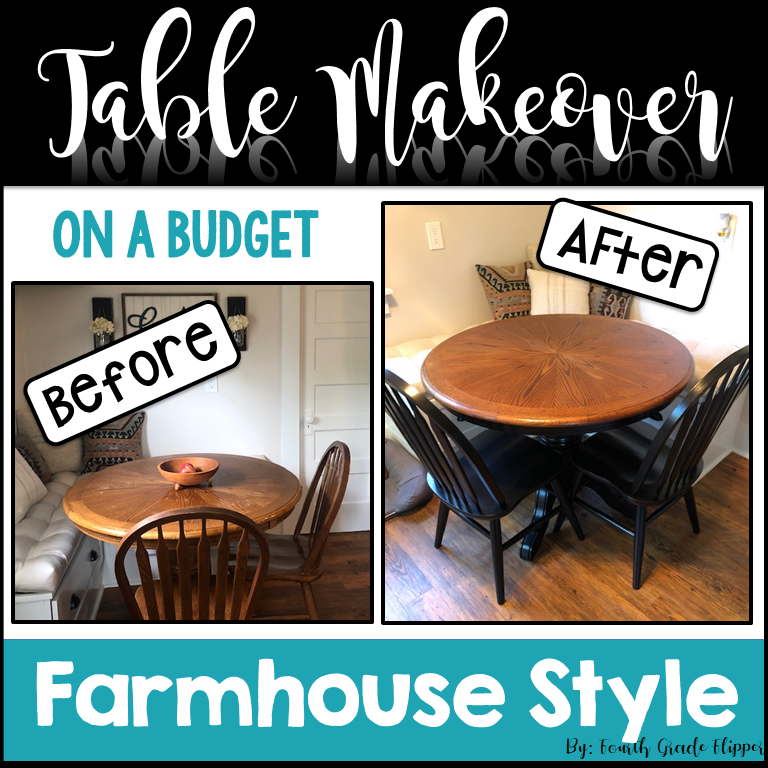
I am loving everything farmhouse style and this table waited about a year until I finally got around to fixing it up. 
This is BEFORE...
I found it on marketplace for $20 and that included three chairs! I see tables like this posted all the time on marketplace for dirt cheap. I still have an extra chair because I only needed two chairs to fit perfect in this little nook I had created during the kitchen model redo. 

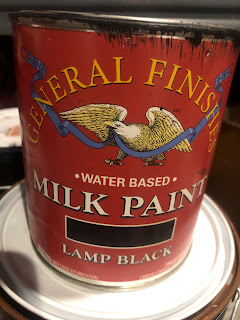
I searched Pinterest for ideas and inspiration for this table redo. Here is my Pinterest board on this topic. There were a lot of great reviews for General Mills milk paint and I knew I wanted a black base and natural wood top. So, I ordered lamp black General Mills paint
Disclaimer: The links on products throughout this post take you to my Amazon affliliate link. This means I earn a small advertising fee if you were to purchase using any of the Amazon links in this post. I was not paid by Amazon or any other company to write this post or advertise any of these products I used. 
What really drew me to this paint was the idea that I could paint the base of the table and my chairs with little prep work. A light sanding was all I needed! I didn't really like the idea of sanding down the whole table to the bare wood! Who really does? Haha! 
Information from Amazon:
  • This paint is self-sealing and does not require a topcoat
  • Do not apply clear topcoats over bright white paint, as yellowing may occur due to a reaction to the substrate. Light color paints may also experience yellowing due to topcoat application, but it will less noticeable
  • Extremely durable premium furniture paint with high adhesion rated for interior or exterior use.
  • Apply over raw wood or prepped existing finishes. Perfect for upcycling and cabinet refinishing.
  • Apply 2-3 coats by roller, brush or sprayer with an HVLP 2.0 tip. Water cleanup.

Before I started painting the base or the chairs, I tackled the top of the table first. I removed it from the base and brought it outside to sand with my round electric sander. It was super fast. I started with a 60 grit to remove the old finish, then used a 120 grit and finally briefly a 220 grit. If you sand too long with a fine grit like 220, it closes up the pores of the wood, so less finish will soak into the wood. It was smooth to the touch after just a bit of 220 sanding. 
Before
After Sanding
Next, I used my favorite color stain, Minwax English Chestnut that matches the original cupboards and woodwork on one side of my kitchen that I refinished years ago. I also always use a pre-stain wood conditioner before applying stain. This trick I learned years ago after refinishing almost all of my existing woodwork in my house. My wood is a douglas fir. The table was oak I believe though. The wood conditioner just gives a nice even stain coat.
After Staining
After letting the stain dry overnight, I was ready to apply the first layer of topcoat. After reading many reviews for durability, I decided to try General Finishes Arm-R-Seal satin Oil Based Topcoat. I am so absolutely THRILLED with how this topcoat turned out! It is amazing. No bubbles, drips, etc. I applied four coats with a lint free cloth. I wiped fast and did not put much product on each time. I sanded very lightly with 220 in between each coat. This table will stand up to years with my kids and leaves no water marks at all! I did let it sit for THREE weeks before I placed any dishes on it. 
It was worth the wait!
 
Then, I got to work using the General Finishes lamp black milk paint on the table base and chairs. It performed exactly like the reviews I read! I only lightly sanded the base and chairs and the paint was so easy to work with! I used two coats on everything.
After one coat...

General Finishes milk paint does not require a topcoat but since these were chairs and I wanted a little more "slip" to them when sitting down and also a little more protection from daily wear, I covered them with the General Finishes satin water based topcoat

This was just as easy to work with as the oil based but minus the smell and water based is recommended for a topcoat over the paint. Even though I used black paint (white really would show yellowing with oil based topcoat), I still didn't want to use the oil based on top of the paint. I only applied one coat of the topcoat. No chips or any signs of wear and it has been about two months of use with sliding chairs to the table.

I was so thrilled with how easy it was to use milk paint that I tackled another project! 
This shelf got a makeover! 

Stay tuned for a post on that. :)

Tuesday, August 25, 2015

Tried It Tuesday {Organizing a Classroom Library}

I know many of you are back to school so I am posting a combination throwback post with ideas for organizing your classroom library. I found furniture for mine on a budget!
What have you tried at school or home?
If you've never linked up with Tried It Tuesday, just link up any idea school or home related and what worked or didn't work. Grab the button below. Simple!
My Tried It:
Organizing a Classroom Library
When I taught 6th grade, I was teaching social studies for a few years and then math for five.  Having a large classroom library was not a top priority.  Then, eight years ago I switched to fourth grade and slowly started collecting books through yard sales, ebay, and donations.  My library has grown every year and this summer I decided that I really wanted to transform it by organizing my books in bins.

There are so many amazing classroom libraries all over the internet.  I have drooled over them, especially this library from Beth Newingham's Scholastic blog post from way back in 2009!  I just love those bookcases and baskets.  The bookcases line up so neatly and you can tell they are great quality.

In addition to not having as many books as I would like, one of my other problems was that I didn't have  amazing sturdy bookcases that line up nice and neat in my room.  
Last summer I bought a cheap bookcase for more storage from WalMart ($15) and it broke by the end of the year.
Back in the summer of 2013, I found two bookcases at local yard sales and they were both very sturdy.  One was $5 and the other was $7.  However, they were different colors and mismatched, so I knew I would have to paint them.  I decided to go with black because I found some bright bins at the Dollar Tree (for $1 each of course) that would just "pop" against the black.
I got to work priming the bookcases.


These mini foam rollers really do a nice job making the work a little easier.
Next, I used an acrylic black gloss paint.

Then, I went to work in my room painting two other bookcases.  A friend gave me the tall bookcase.  This one is not as sturdy as the other three but it makes a good corner piece.  The other bookcase is school grade quality and super sturdy.
There was one shelf that was not removable in the tall bookcase.  The others were removed and painted on a flat surface using the same foam mini roller.
I am not even sure how many hours I spent painting these four bookcases, but it was many!  Each bookcase took THREE coats of the black paint!  Painting the little nooks and crannies in the "ABCD" bookcase was a complete pain too.  However, they looked awesome when I was done.  So, you can just imagine how disappointed I was when I placed these book bins on the shelves and they scratched the paint and were like sticking to the paint!  The original two bookcases had been drying for like a month and the other two were only drying for two days.  But still!!!  What was I going to do?

My first solution was to spray this Mod Podge adhesive on the shelves to "protect" them from scratches.
It covered the shelves okay but I couldn't spray many coats because it was the stinkiest, toxic stuff on the planet and unless I wanted to haul all the bookcases outside, I wasn't going to be spraying that anymore!  Next, I tried my trusty varnish from my mod podge projects.  I brushed it on the top of each shelf with a foam disposable brush.
I let it dry a few days, went back to school and loaded the bins back on the shelves.  


The varnish has seemed to work and the bins don't "stick" anymore.  I am nervous about how it will hold up to student usage though.  UPDATE: Now in 2015, the bins have held up beautifully! I haven't touched them up a bit and there are a few marks here and there in the paint but nothing major! Those fourth graders can sure be tough on furniture and I will have all fifty 4th graders using my library this year since we are departmentalizing.

My books also have color coded labels on the binding (sealed with shipping tape) according to their AR (Accelerated Reading) level. Each grade level is a different color.
I attached my editable owl book bin labels using shipping/packaging tape and that has held up great except on these small "holey" bins (all my bins are from the Dollar Tree).  I don't know why I didn't think of it before, but the dust collected on the tape through the little holes and the labels started falling off! I am a tad anal and it was very annoying.
My solution?  I went back to the Dollar Tree and bought these replacement bins (no holes!).  I'm just glad I could find some that they had in stock that matched my other bins and were small enough for this shelf.  Now, there are no holes and the labels should stay put! UPDATE: Now two school years later, I haven't had to replace the shipping tape that I used to secure the labels on any of the bins! I know many teacher laminate and hot glue the bins or hook them on with hooks. I just like to have things flat and no curling edges or things poking out. I'm just a little weird like that. :) It is amazing that they have held up so well though!
I was also worried that the bins would end up in a disarray on the shelves.  I snapped these photos yesterday without straightening the bins on the shelves and they look passable by my standards!  I talk to the students about putting the book bins back neatly and they have listened for the most part. :)  
In addition to these owl themed book bin labels, I also have Bright Chevron, Bright Polka Dot, Superhero, and Zebra themed labels in my TpT Store. They all include two sizes of labels and are editable to add labels of your choice!


Thursday, August 20, 2015

Start Year Off with This Writing Skill: Post on iTeach 4th

As back to school is in full mode, do you use this important writing skill throughout the year with your students to help them master answering questions? Check out my post today at iTeach 4th for some ideas!
Click on the logo below!


Tuesday, August 18, 2015

Tried it Tuesday {Glitter Stenciling}

Hi everyone! It's Time for Tried It Tuesday!
What have you tried at school or home?
If you've never linked up with Tried It Tuesday, just link up any idea school or home related and what worked or didn't work. Grab the button below. Simple!
My Tried It:
Glitter Stenciling
I am still trying to knock items off my to-do list before summer draws to a close. Many of you are back at school but we start officially after Labor Day. Maybe I can even get in a Monday Made It before the end of summer. I will be working on updating classroom curtains this week and making a curtain for under my daughter's loft bed. That brings me to this week's Tried It. My daughter is now 8 years old and her room needed an update. She wanted a more "mature" color on her walls. Sniff sniff. :( This is her room before.
So, I sanded the old stencils before repainting and patched some things.
I painted the walls in Glidden "Mushroom Cap" matte. Then, I bought a pint of Glidden "Bonjour Beige" in satin for the stenciling. It is just a shade darker than the wall color. I knew I wanted a glitter effect in the stenciling and bought this extra fine glitter at Walmart. 

 At first, I wasn't going to add the glitter directly to the paint but was going to try a put a glitter glaze over top of the stencil. However, I decided to try it. What was the worst that could happen? I poured a small amount of paint in a 1 cup measuring cup and started adding glitter.
I used about half of the bottle of glitter for about 1/3 cup paint. I had a lot of paint left over too from the measuring cup when I was done stenciling.
 Glitter mixed in paint:
 Stencils I bought. I only used the large one but may add small flowers later.
 My daughter helped out too! Here she is stenciling a flower with a stencil brush.
You don't need much paint on the brush.
 Here is a picture of her room. I am sewing a new curtain for under the loft bed. I will post pictures when that is done. :)
 Another view...
 Stencil up close with glitter
 Bedding is Paige Quilted bedding from Pottery Barn Kids.
 Rug is also from Pottery Barn Kids and has flecks of gold sparkle!
If my maintenance staff allows it, I would like to try some paint with glitter stenciling in the classroom! It was so easy and I love how it turned out!